Introduction
In this article we will be learning how we can integrate AWS Amplify with-in a Nuxt app. We will be going over from setting up an AWS account (but not covered, will give you a link instead) and until we can create and fetch all Todos. The app that we will be building for this tutorial is just a basic Todo app, since the scope of this tutorial is to teach you how you will be able to use AWS Amplify with Nuxt.
I prefer to use TypeScript in this article, but you can still use just plain JavaScript whichever you prefer still results to same Todo app we will be building. But before we continue, let us understand what is Serverless? What does it actually mean?
Serverless does not mean there are no servers. There are still servers that run on the cloud but we don't manage them, meaning we don't have to deal with deploying web servers using Nginx or Apache2, we don't have to provision AWS EC2 instances or GCP Compute Engine instances, we only have to worry about directly to the business logic of the application. Isn't that cool?
For more explanation I will quote a definition from Cloudflare:
Serverless computing is a method of providing backend services on an as-used basis. A serverless provider allows users to write and deploy code without the hassle of worrying about the underlying infrastructure. A company that gets backend services from a serverless vendor is charged based on their computation and do not have to reserve and pay for a fixed amount of bandwidth or number of servers, as the service is auto-scaling. Note that despite the name serverless, physical servers are still used but developers do not need to be aware of them.
Taken from source
Setting up an AWS Account
You can skip this step if you already have setup an AWS account. Otherwise go to this URL aws.amazon.com/console and proceed to creating your AWS account! And click on the button that says "Create a Free Account". You will need a credit card to setup your AWS account otherwise you can't create one.

I am not going to go over how to setup an AWS account in here since it is an out of scope for this tutorial. But I will give you some links for my recommendation.
Also make sure to create an IAM user since AWS best practices for security is to not use the root user, instead create an IAM user and give it admin privileges and this is the only account you will be using from now on. You will only use the root user to create an admin user for your AWS account.
Installing AWS Amplify CLI
Once you are done with setting up your AWS account, let us then proceed to installing the AWS Amplify CLI! We will be using NPM and install to globally on your system, don't forget to add sudo otherwise you will experience permissions error.
$ npm install -g @aws-amplify/cli
with sudo,
$ sudo npm install -g @aws-amplify/cli
Just to make everything clear, just in case.
Once you are done installing aws-amplify globally on your machine, let's then proceed to setting up configuration details so you can integrate this with-in your AWS account as it will ask you to sign in to AWS Console.
Further steps should be continued from the official docs as they provide you the complete steps in setting up your account.
Installing Nuxt
Open up your terminal and navigate into your projects directory or any directory that you prefer to install the Nuxt app. For me I prefer it to be placed under "tutorials" directory since I am creating a tutorial on how to setup Nuxt with AWS Amplify.
$ cd ~/tutorials
Then proceed to execute the command to start the installation process.
# Where <project_name> is the name of the Nuxt project
# In this case I will name it as "nuxt-aws-amplify-todo-app"

$ npx create-nuxt-app <project_name>
In selecting the installation options, for the programming language I select TypeScript since it is my preferred choice and my "go-to" language. Package manager would just be NPM. And the UI library I select "Vuetify.js" I prefer this one since it provides a lot of Material design components out of the box, but you can select any UI library whichever you prefer. For the Nuxt modules, these are optional and you can select anything. For now I will select neither of these modules. Just hit ENTER key to continue without selection.

Same applies to Linting tools and Testing framework just nothing.
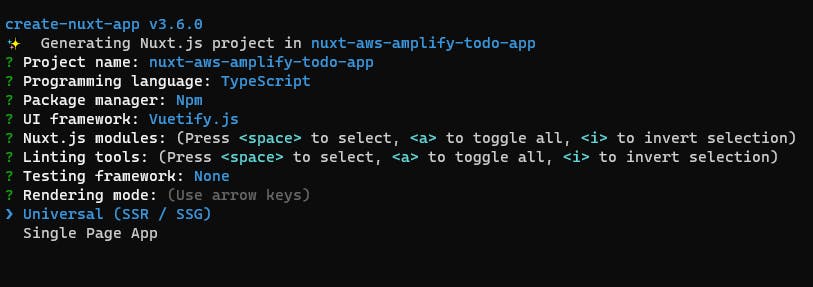
We will select rendering mode to be a Single Page Application, and deployment target would be Static since we do not need anything server side rendered. And for the development tools, if you select TypeScript you don't have to choose jsconfig.json otherwise you can. For the other options I will not select any of them for now.

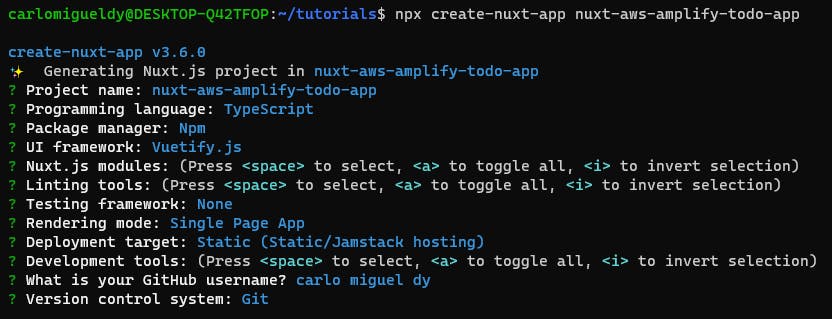
Now to sum it all up regarding our installation selection, this is what we have.
Proceed to opening the new generated Nuxt project in your IDE (Visual Studio Code), do it via
$ cd nuxt-aws-amplify-todo-app && code .
This will then open up Visual Studio Code.
(Optional) Installing Nuxt Dependencies
These are optional but you can follow as well. I will be installing the following:
@nuxtjs/composition-api: This module is not recommended for production but soon it will be once Nuxt 3 comes out. When you are using this package, there will be bugs so keep that in mind in case you might get stuck then you can create an issue from the repository on Github and that counts as your contribution to the package.
Note: I will not cover how to setup this module but you can refer on the official docs instead.
@nuxtjs/google-fonts: I want to use "Sora" font just because FeedHive was using this and I think it's a cool font.
Note: I will not cover how to setup this module but you can refer on the official docs instead.
We'll also want to customize some of the default SCSS variables for Vuetify.js on some components and to apply "Sora" font-family as the main font to be used globally.
To customize, head on over to nuxt.config.js and on to the vuetify property, just add treeShake property with value of true, make sure to have treeShake set to true otherwise overriding SCSS variables for Vuetify will not work.
Also to verify you can reference on the code below on how I setup my nuxt.config.js file for these changes.
export default {
   // ... other properties
   buildModules: [
      // ...

      '@nuxtjs/composition-api',
      '@nuxtjs/google-fonts'
   ],

   vuetify: {
      customVariables: ["~/assets/variables.scss"],
      treeShake: true
   },

   googleFonts: {
      families: {
         Sora: true
      }
   }
}
Then edit the variables.scss file and setup the following SCSS variables.
$body-font-family: "Sora", sans-serif;
$btn-letter-spacing: 0px !default;
$btn-text-transform: none;
And that's all we have for customizing the look for our Todo application we can then proceed with integrating AWS Amplify into our project.
Integrating AWS Amplify in the Nuxt project
Before we start, install the library so we'll have access to its core.
$ npm i aws-amplify
Now let us setup our backend using AWS Amplify. Given that you already have opened your Nuxt project right after installation then proceed to opening a new terminal instance under your IDE (Visual Studio Code) or if you prefer it in a different window that's fine as well but be sure you are in the root directory of your project.
Then execute this command to initialize or create a new AWS Amplify project.
$ amplify init
When presented with the questions, I have selected the default settings and modified only the "Source Directory Path" to . and for the "Build Command" is set to npm run build && npm run generate since we are going for a Nuxt Static SPA, and lastly the "Start Command" which is npm run start. I believe these build and start commands will be used if you prefer to host it on AWS ecosystem (S3 Bucket)
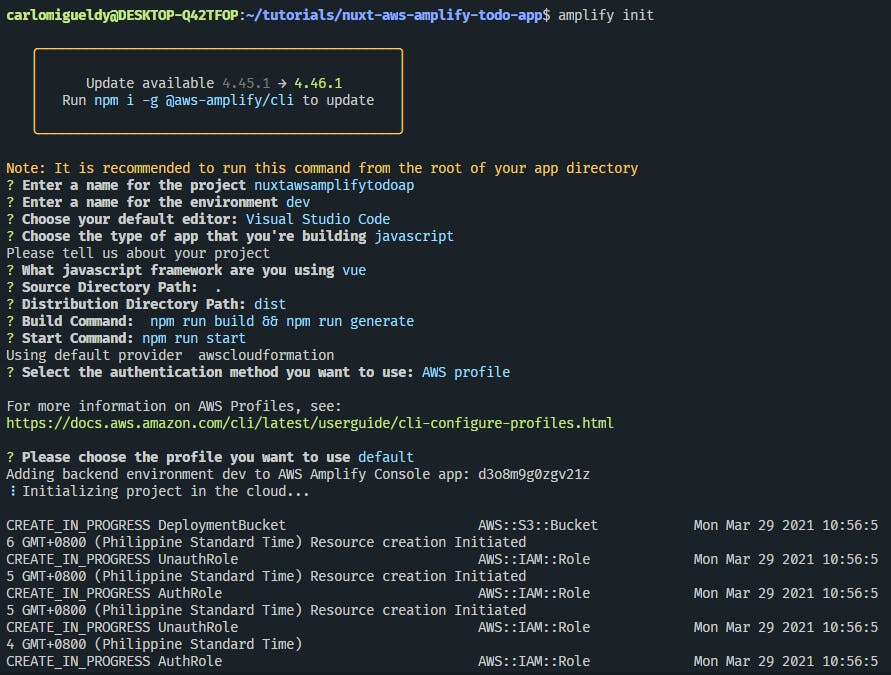
Once the initialization process is done, it should look similar to this by now.
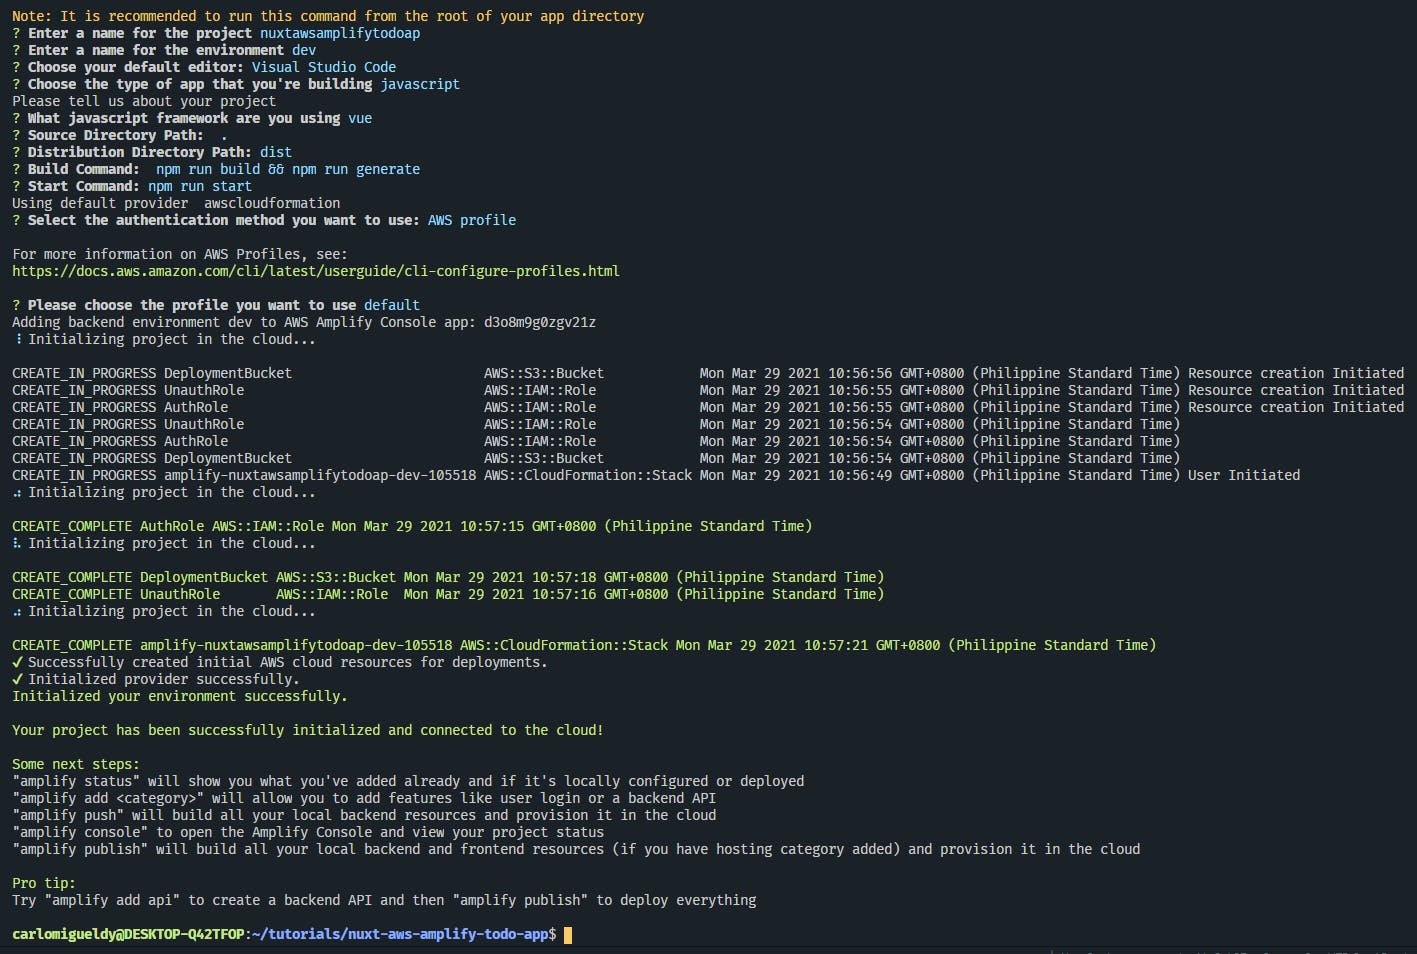
Next and very important step, you must setup the aws-exports.js plugin. Create a file under plugins directory and name it as aws-amplify.js then copy the following code and paste on to it
import Amplify from "aws-amplify";
import aws_exports from "~/aws-exports";

Amplify.configure(aws_exports);
Then go to nuxt.config.js and add the following into the plugins array
export default {
   // ...

   plugins: ["~/plugins/aws-amplify"]
}
Since we are building a Todo app, then we will need a place to store our data. AWS Amplify can provide us a data store using DynamoDB. So let us continue setting up and add a backend API with the following command.
$ amplify add api
You can follow with my selection:

AWS Amplify already have an existing example for a Todo App so we'll use that one.
And once everything is set up correctly and is done, there are files generated for you with the GraphQL schema, resolvers, all those good stuff. So your project folder would look something like this by now.
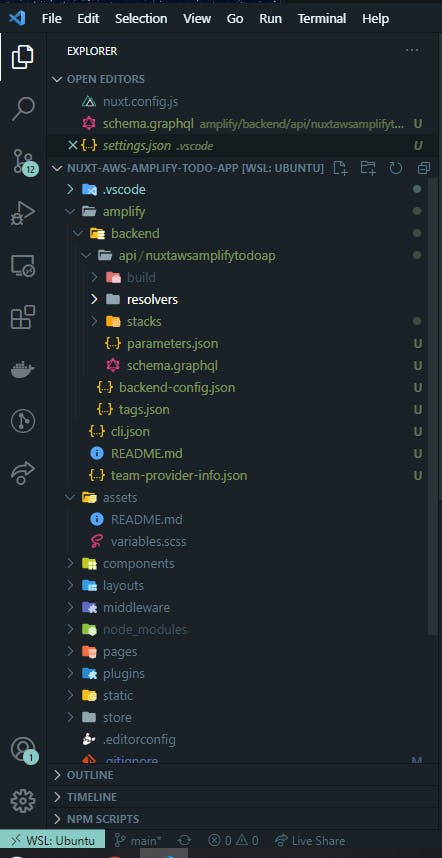
Don't worry about the other files the were generated, you don't have to bother with them those are just the configurations files so that AWS Amplify will understand which server instance we are talking to behind the scenes. At least that's how I understand it.
We can take a look at our GraphQL schema that was auto generated by AWS Amplify for us.
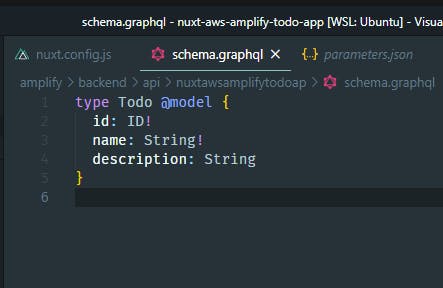
Then let us proceed to deploying these into AWS. Let us execute the following command below so we can start making requests to the server via GraphQL.
$ amplify push
You will be then asked some questions to select from by the CLI.
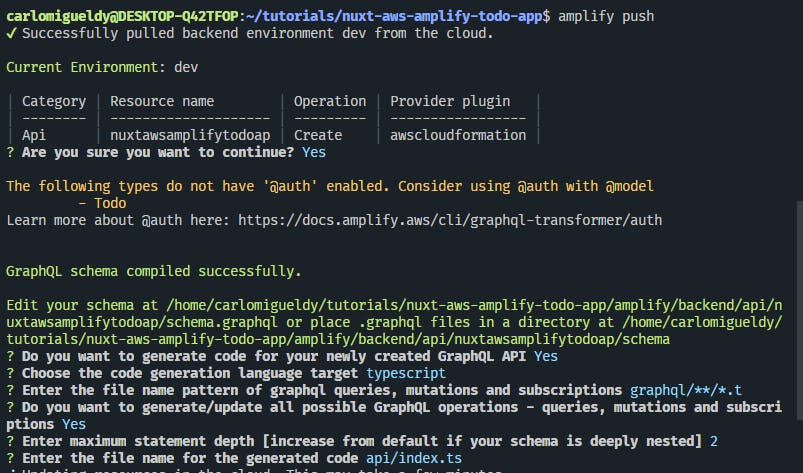
To break it down for you, we tell CLI we want to auto generate GraphQL code, we select TypeScript as the output of the generated code, the filename pattern will reside in a graphql directory, we want AWS Amplify CLI to auto generate us all the possible operations/queries/resolvers that we might use for our Todo App, and the file name of the generated code will reside under api directory with file name as index.ts
Right after the installation process you will then be presented the GraphQL endpoint and the GraphQL API KEY which I don't want to expose it in here.
Now that it's all set up we can then proceed to building the UI of our app.
User Interface
I am just going to make it simple but of course feel free to build the UI in any form you want. For the UI we will have a form and a list that will list out the todos. Before we start building out the UI, open a server for the Nuxt app. In your terminal execute the command.
npm run serve
That will then provide you a URL for the app, typically it is http://localhost:3000 so open it up in your browser.
Once that is done, I made some modifications the following are:
- I have deleted two files under
componentsdirectory those areLogo.vueandVuetifyLogo.vue - I have deleted all the code for the app layout which can be found under
layoutsdirectory with file name ofdefault.vue.
<template>
    <v-app app>
       <Nuxt />
    </v-app>
</template>
- I have also deleted
inspire.vueunderpagesdirectory. - And removed all code for
index.vueunderpagesdirectory and replaced it with the following:
<template>
  <div></div>
</template>

<script lang="ts">
import { defineComponent } from "@vue/composition-api";

export default defineComponent({
  setup() {}
});
</script>
It will be a grid layout, on the left side will be the form and on the right side will be the list.
<template>
  <div>
    <v-row>
      <v-col cols="12" xs="12" sm="12" md="4" lg="4" xl="4">
        <v-form></v-form>
      </v-col>
      <v-col cols="12" xs="12" sm="12" md="8" lg="8" xl="8">
        <v-list>
          <v-list-item></v-list-item>
        </v-list>
      </v-col>
    </v-row>
  </div>
</template>
Creating a Todo
Then we proceed to writing out the code to create our first Todo! Take a look at the code under.
HTML template,
<template>
  <div>
    <v-row>
      <v-col cols="12" xs="12" sm="12" md="6" lg="6" xl="6">
        <v-form ref="formRef" @submit.prevent="submit">
          <v-text-field
            label="Name"
            v-model="formData.name"
            :rules="requiredRule"
          ></v-text-field>
          <v-textarea
            label="Description"
            v-model="formData.description"
          ></v-textarea>
          <v-btn color="primary" class="my-5" large depressed type="submit">
            Submit
          </v-btn>
        </v-form>
      </v-col>
      <v-col cols="12" xs="12" sm="12" md="6" lg="6" xl="6">
        <v-list>
          <v-list-item v-for="(item, index) in todos" :key="index">
            <v-list-item-content>
              <v-list-item-title>{{ index }}</v-list-item-title>
              <v-list-item-subtitle>Description</v-list-item-subtitle>
            </v-list-item-content>
            <v-list-item-action>
              <v-btn color="transparent" depressed fab>
                <v-icon>mdi-delete-outline</v-icon>
              </v-btn>
            </v-list-item-action>
          </v-list-item>
        </v-list>
      </v-col>
    </v-row>
  </div>
</template>
TypeScript code,
import { defineComponent, computed, ref } from "@vue/composition-api";
import { createTodo } from "~/graphql/mutations";
import { API } from "aws-amplify";

type Todo = {
  name: string;
  description?: string;
};

const createTodoDtoDefaults: Todo = Object.freeze({
  name: "",
  description: ""
});

export default defineComponent({
  setup() {
    const formData = ref<Todo>({
      ...createTodoDtoDefaults
    });
    const todos = ref<Todo[]>([]);

    const formRef = ref();

    const requiredRule = computed(() => [
      (v: string) => !!v || "This field is required"
    ]);

    async function submit() {
      if (formRef.value.validate()) {
        await API.graphql({
          query: createTodo,
          variables: {
            input: formData.value
          }
        });

        // reset the `formData` values
        formData.value = {
          ...createTodoDtoDefaults
        };
      }
    }

    return {
      todos,
      formData,
      formRef,
      submit,
      requiredRule
    };
  }
});
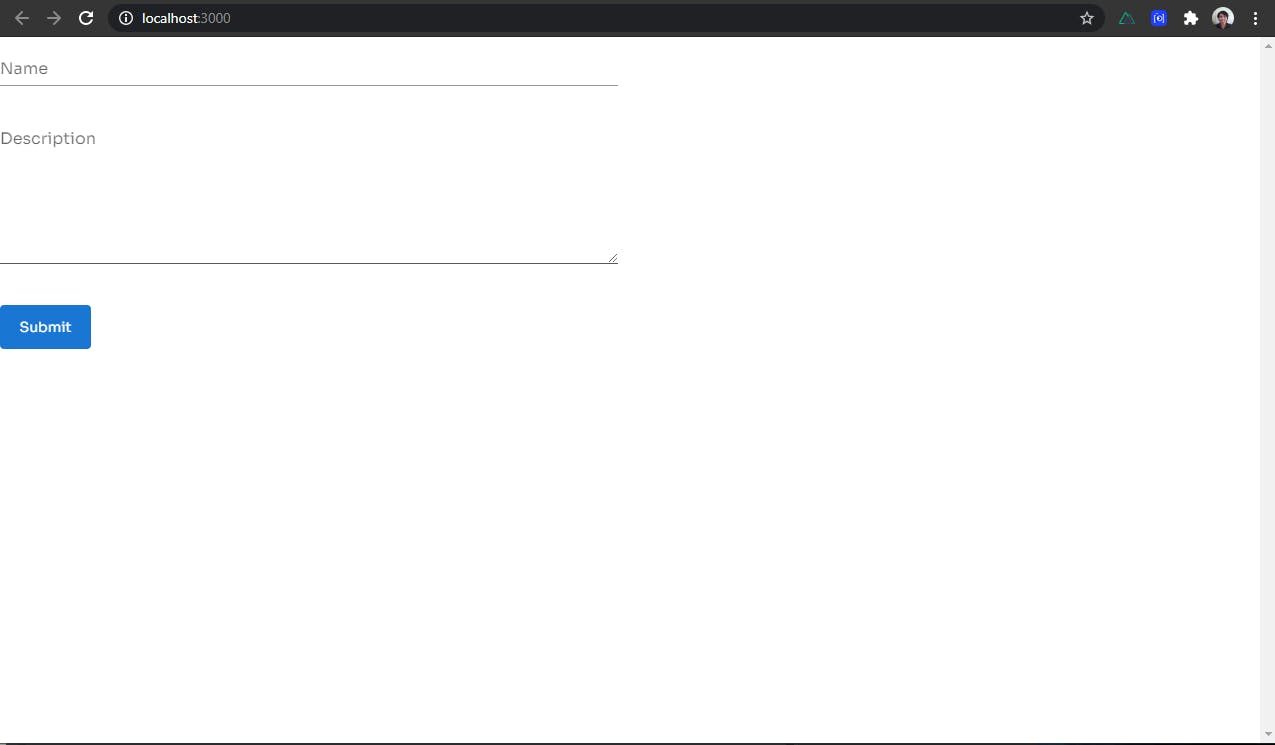
By now we already have our form setup and it is using validation from one of the built-in feature of Vuetify's VForm component which is pretty convenient. A user can write a Todo now by typing in to the form, but whenever a user clicks the Submit button when the title field is empty, then it should not continue and therefore the app will not dispatch a call to the GraphQL API to create a new todo. Otherwise the Todo will be created!
Currently this is how the app looks from my end,
Fetching all Todo
When you tried to create a Todo by now, and sure there wasn't any data returned yet. So let us proceed to fetching all Todos from the API.
export default defineComponent({
  setup() {
    // ...

    const todos = ref<Todo[]>([]);

    // ...

    async function fetchAllTodo() {
      const response = await API.graphql({
        query: listTodos
      });
      // @ts-ignore
      todos.value = response.data.listTodos.items as Todo[];
    }

    async function submit() {
      if (formRef.value.validate()) {
        await API.graphql({
          query: createTodo,
          variables: {
            input: formData.value
          }
        });

        // reset the `formData` values
        formData.value = {
          ...createTodoDtoDefaults
        };
        fetchAllTodo();
      }
    }

    onMounted(() => {
      fetchAllTodo();
    });

    // ...
  }
});
So we defined fetchAllTodo() method that handles to fetch all Todos from the API by making a request to GraphQL using the query that was auto-generated for us! We will call this method in two places, under submit() method is when user's form input is valid and a Todo will be created then we should re-fetch the data to show the created Todo on the list. And the other place is from the onMounted life cycle, we are using composition functions so we call it from onMounted(() => {}) as that will handle calling to the API for fetching the Todos that are stored every time a User opens the app the first time.
So for the last time, this is the entire code for this Todo App.
<template>
  <div>
    <v-row>
      <v-col cols="12" xs="12" sm="12" md="6" lg="6" xl="6">
        <v-form ref="formRef" @submit.prevent="submit">
          <v-text-field
            label="Name"
            v-model="formData.name"
            :rules="requiredRule"
          ></v-text-field>
          <v-textarea
            label="Description"
            v-model="formData.description"
          ></v-textarea>
          <v-btn color="primary" class="my-5" large depressed type="submit">
            Submit
          </v-btn>
        </v-form>
      </v-col>
      <v-col cols="12" xs="12" sm="12" md="6" lg="6" xl="6">
        <v-list>
          <v-list-item v-for="(item, index) in todos" :key="index">
            <v-list-item-content>
              <v-list-item-title>{{ item.name }}</v-list-item-title>
              <v-list-item-subtitle>
                {{ item.description }}
              </v-list-item-subtitle>
            </v-list-item-content>
          </v-list-item>
        </v-list>
      </v-col>
    </v-row>
  </div>
</template>

<script lang="ts">
import {
  defineComponent,
  computed,
  ref,
  onMounted
} from "@vue/composition-api";
import { createTodo } from "~/graphql/mutations";
import { API } from "aws-amplify";
import { listTodos } from "~/graphql/queries";

type Todo = {
  name: string;
  description?: string;
};

const createTodoDtoDefaults: Todo = Object.freeze({
  name: "",
  description: ""
});

export default defineComponent({
  setup() {
    const formData = ref<Todo>({
      ...createTodoDtoDefaults
    });
    const todos = ref<Todo[]>([]);

    const formRef = ref();

    const requiredRule = computed(() => [
      (v: string) => !!v || "This field is required"
    ]);

    async function fetchAllTodo() {
      const response = await API.graphql({
        query: listTodos
      });
      // @ts-ignore
      todos.value = response.data.listTodos.items as Todo[];
    }

    async function submit() {
      if (formRef.value.validate()) {
        await API.graphql({
          query: createTodo,
          variables: {
            input: formData.value
          }
        });

        // reset the `formData` values
        formData.value = {
          ...createTodoDtoDefaults
        };
        fetchAllTodo();
      }
    }

    onMounted(() => {
      fetchAllTodo();
    });

    return {
      todos,
      formData,
      formRef,
      submit,
      requiredRule
    };
  }
});
</script>
Conclusion
So we learned how to setup AWS Amplify for our Nuxt app with Composition API and TypeScript. If you have been planning to use AWS Amplify with Nuxt, then I hope this tutorial was helpful for you. However I might have only covered fetching and creating a Todo but as you see it the article has been very long, so I chose not to include those functionalities but you can explore more about AWS Amplify from the official documentation.
Thank you for taking the time to read and if you liked this be sure to like the post as well and if ever you want any future Nuxt tutorials like this let me know!
Full source code can be found from the repository for your reference
